
Selenoid. Selenium in Docker
My previous post will include a introduction into writing tests with Selenium. In this I want to share you my experience with Selenoid. And we create a test environment that help us to run the tests remotely in Docker.
Selenoid Grid
Selenoid Grid or simple Selenoid is a robust implementation of the Selenium Hub using Docker containers to launch browsers. No need to manually install browsers or dive into WebDriver documentation. Any browser session can be saved to the H.264 video. An API to list, download, and delete saved log files. Suitable for personal usage and in big clusters.
- Consumes 10 times less memory than Java-based Selenium server under the same load
- Small 6 Mb binary with no external dependencies (no need to install Java)
- Browser consumption API working out of the box
- Ability to send browser logs to centralized log storage
- Fully isolated and reproducible environment
Selenoid Grid composition
Selenoid should be used with two components:
- Selenoid - Selenium Hub successor running browsers within containers.
- Selenoid-ui - Graphical user interface for Selenoid project and check run time browsers and logs.
Now let’s create a simple Grid by using Selenoid Images with Docker on the local machine and you can run Test cases.
Prerequisite
Docker should be installed on your machine where you want to run this Selenium Grid.
Quick Start Guide
Create a DockerCompose File
docker-compose file is a configuration file for docker, by using the compose files its easy to create and stop Containers.
We are creating 2 services selenoid and selenoid-ui in docker-compose.yml file,
which will run as 2 containers. You can read official documentation of docker compose file.
Let’s create a docker-compose.yml file in you local system.
version: '3'
services:
  selenoid:
    image: "aerokube/selenoid"
    network_mode: bridge
    restart: always
    ports:
      - "4444:4444"
    volumes:
      - "$PWD:/etc/selenoid/" # assumed current dir contains browsers.json
      - "/var/run/docker.sock:/var/run/docker.sock"
  selenoid-ui:
    image: "aerokube/selenoid-ui"
    network_mode: bridge
    restart: always
    links:
      - selenoid
    ports:
      - "8080:8080"
    command: ["--selenoid-uri", "http://selenoid:4444"]
Create browsers.json
Using the docker-compose file we have to pass the browsers using a Json file.
browsers.json file contains all the browsers and their version we want to run in the Selenoid Grid.
In our JSON file we are defining two last versions for both browsers - Chrome and Firefox.
We define VNC and non-VNC version. VNC allows to see and interact with browser at real time and you can check the logs from the container which is showing all the actions. But it has required additional resource consumption.
Different default locales will help us to get more predictable results.
Let’s create a browsers.json file in the current directory where docker-compose.yml file is present.
{
    "firefox": {
        "default": "72.0",
        "versions": {
            "72.0_VNC": {
                "image": "selenoid/vnc:firefox_72.0",
                "port": "4444",
                "path": "/wd/hub",
                "env" : ["TZ=Europe/Moscow", "LANG=ru_RU.UTF-8", "LANGUAGE=ru:en", "LC_ALL=ru_RU.UTF-8"]
            },
            "72.0": {
                "image": "selenoid/firefox:72.0",
                "port": "4444",
                "path": "/wd/hub",
                "env" : ["TZ=Europe/Moscow", "LANG=ru_RU.UTF-8", "LANGUAGE=ru:en", "LC_ALL=ru_RU.UTF-8"]
            }
        }
    },
    "chrome": {
        "default": "80.0",
        "versions": {
            "80.0": {
                "image": "selenoid/chrome:80.0",
                "port": "4444",
                "path": "/",
                "env" : ["TZ=Europe/Moscow", "LANG=ru_RU.UTF-8", "LANGUAGE=ru:en", "LC_ALL=ru_RU.UTF-8"]
            },
            "80.0_VNC": {
                "image": "selenoid/vnc:chrome_80.0",
                "port": "4444",
                "path": "/",
                "env" : ["TZ=Europe/Moscow", "LANG=ru_RU.UTF-8", "LANGUAGE=ru:en", "LC_ALL=ru_RU.UTF-8"]
            }
        }
    }
}
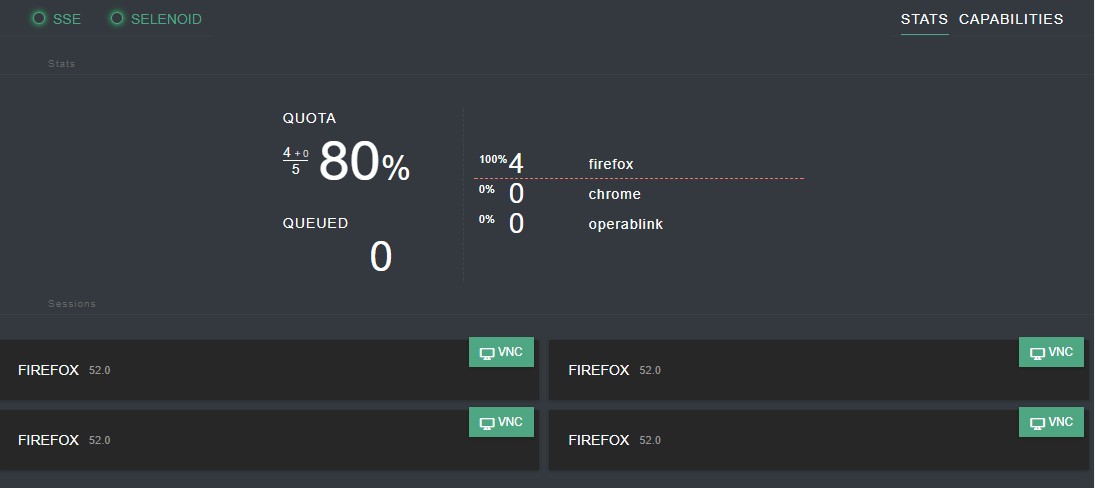
What is Selenoid UI
Selenoid UI is also a very cool feature in the Selenoid project where we can see the Live Test Running on multiple containers.
If you look closely in to the composer file above the selenoid-ui service is running on port 8080 and linked with the selenoid service.
So if we run the docker compose file above the docker container will start both the service by default.
We can access the UI using the URL: localhost:8080
Start the Selenoid Grid
Starting the Selenoid Grid is very easy and simple by using the docker-compose file we have made in above steps.
Let’s run the following command from where our docker-compose.yml file is present:
docker-compose up -d
After running the docker compose command, Docker will automatically download the proper images of selenoid before starting the container. But sometimes you have to manually download defined browser images.
docker pull selenoid/chrome:80.0
docker pull selenoid/firefox:72.0
docker pull selenoid/vnc:chrome_80.0
docker pull selenoid/vnc:firefox_72.0
As Selenoid Hub which is running on 4444 port will receive the request and create a container with the browser asked from Test script and will kill the container after the Test.
Create tests
With the previous article we already learn how to run a simple tests with Python. Let’s create a new one. We will connect it to our remote Selenoid Hub by localhost network.
Open Python interpreter and copy next commands:
from selenium import webdriver
from selenium.webdriver.common.desired_capabilities import DesiredCapabilities

chrome = webdriver.Remote(
          command_executor='http://localhost:4444/wd/hub',
          desired_capabilities=DesiredCapabilities.CHROME)
firefox = webdriver.Remote(
          command_executor='http://localhost:4444/wd/hub',
          desired_capabilities=DesiredCapabilities.FIREFOX)

chrome.get('https://www.google.com')
print(chrome.title)

firefox.get('https://www.google.com')
print(firefox.title)

chrome.quit()
firefox.quit()
If we run it, we could view two sessions in Selenoid UI available at the link: http://localhost:8080/
If we talk about simultaneous testing on different devices, e.g: we have a cross-platform web app with a real-life chat function, we can simultaneously test the interaction between them, that is obviously comfortable.
Conclusion
Solution on the basis of Selenium in Docker demonstrates high flexibility for configuration of the runtime environment. The stability of this solution, significant time savings when using it and a number of additional features allow us to optimize the process and ensure high-quality software products in a short time. As a result, it allow us to perform test automation tasks quickly and accurately.
Here you can download the fully configured project and play with it.
Happy testing!
Additional information
- Aerokube. Efficient Selenium Testing Infrastructure - the start page to explore automation testing
- Selenium with Python - Selenium library for Python